Create a custom flow-node
8 minute read
This document describes how to create a custom flow-node.
Introduction
As an example of how to write a flow-node using the API Builder SDK (@axway/api-builder-sdk), we will examine the creation and customization of a sample encodeURI flow-node that URI encodes a string. This includes the following steps:
- Create a new API Builder flow-node plugin
- Define the encodeURI flow-node
- Implement the flow-node method
- Install the plugin in an API Builder project
Prerequisites
API Builder CLI: All commands on this page require installation of the API Builder CLI as described in the Getting Started With API Builder .
API Builder project: An API Builder project is required to install and test your new flow-node. You can use an existing project, or initialize a new one with the following instructions:
// Create a new API Builder project

axway builder init example-project
Creating an encodeURI flow-node
This tutorial will demonstrate how to create a custom flow-node for use in the API Builder Flow Editor. For this example, we will create a flow-node that will encode a URI given a string as an input using the encodeURI function.
Step 2: Create a new API Builder flow-node plugin
Use the API Builder CLI to initialize a new plugin:
// Create a new flow-node plugin

axway builder plugin init encodeuri
cd api-builder-plugin-encodeuri
This will initialize a new plugin and install the API Builder SDK and all the required dependencies for you. The new plugin has the following contents:
// Create a new flow-node plugin

├── package.json
├── src/
│ ├── actions.js
│ ├── flow-nodes.yaml
│ ├── icon.svg
│ └── index.js
├── README.md
└─┬ test/
  └── test.js
| File Name | Description |
|---|---|
| package.json | This is your module package description file. You should modify it to suit your module. The file is used by npm. See here for more details. |
| src/actions.js | This file is where you will use Node.js/JavaScript to implement the methods defined in `src/flow-nodes.yml`. |
| src/flow-nodes.yml | This file is where you will define your flow-node and methods. |
| src/icon.svg | The icon file that is displayed for your flow-node in the UI . Supports image formats: bmp, jpeg, png, gif, tiff, or svg. |
| src/index.js | The entry point to your API Builder plugin. Exports a function called `getPlugin` which returns your plugin. |
| test/test.js | A mocha test suite. You should ensure all of your actions are adequately tested. |
| README.md | A README.md file that you should update with details about your plugin before publishing. It should contain details about how to install it, and the functionality it provides. |
Step 3: Define the encodeURI new flow-node
Customize the encodeURI flow-node definition in the `src/flow-nodes.yaml` file.
flow-nodes:
  encodeuri:
    name: Encode URI
    icon: icon.svg
    description: URI encoder.
    category: utils
    methods:
      encode: # This same key is used in `actions.js`
        name: Encode URI
        description: Encodes a URI by replacing each instance of certain characters with UTF-8 encodings.
        parameters:
          uri:
            name: URI
            description: The URI to encode.
            required: true
            initialType: string
            schema:
              type: string
        # "Next" output
        returns:
          name: Next
          description: The URI was encoded successfully.
          context: $.encodedURI
          schema:
            type: string
        # "Error" output
        throws:
          name: Error
          description: An unexpected error was encountered.
          context: $.error
          schema:
            type: string
To explain what occurs in the src/flow-nodes.yaml file, we will break the file down piece by piece.
The file defines a structure, a specification, that determines:
- The flow-node(s) to export.
- The method(s) that comprise each flow-node.
The first portion of it allows you to define the flow-node name, icon, description, and category:
  encodeuri:
    name: Encode URI
    icon: icon.svg
    description: URI encoder.
    category: utils
    ...
- The
nameis the text that is displayed in the Flow Editor. - The default
iconis a placeholder (a star) that should be replaced with a graphic that represents the action of the flow-node. The icon is displayed at 28 pixels by 28 pixels. - The
descriptionis the text that is displayed in the Flow Editor to describe your flow-node. - The
categoryis the section in the Flow Editor tool panel where the flow-node is contained.
The next section adds a single method encode and describe its parameters and outputs:
  methods:
    encode: # This same key is used in `actions.js`
      name: Encode URI
      description: Encodes a URI by replacing each instance of certain characters with UTF-8 encodings.
      parameters:
        uri:
          name: URI
          description: The URI to encode.
          required: true
          initialType: string
          schema:
            type: string
    ...
A method called encode, that is displayed in the Flow Editor as Encode URI, was added. The encode method has a single parameter. If we needed more parameters, we would repeat the whole parameterblock.
The next two sections after the parameters defines the value that is returned from your action method and the Error that may be thrown from your action method:
  parameters:
    ...
  # "Next" output
  returns:
    name: Next
    description: The URI was encoded successfully.
    context: $.encodedURI
    schema:
      type: string
  # "Error" output
  throws:
    name: Error
    description: An unexpected error was encountered.
    context: $.error
    schema:
      type: string
Understand how actions work - The method key correlates to an action in the src/actions.js file. We renamed the example method from `hello` to `encode` above in the flow-node specification in flow-nodes.yml, now we need to also rename it in src/actions.js in Step 4.
Step 4: Customize the flow-node method implementation
To simplify the management of the code, the starter project puts the implementation of the methods in the action.js file. There is no a requirement to follow this pattern. You can structure your project according to your needs. As mentioned in the previous step, we need to amend the sample action method to reflect the renaming of the `hello` method to `encode` as follows:
async function encode(params, { logger }) {
    const { uri } = params;
    if (!uri) {
        logger.error('The uri parameter is missing.');
        throw new Error('Missing required parameter: uri');
    }
    return encodeURI(uri);
}

module.exports = {
    encode
};
This is a simple scenario, but it highlights the main features. The parameters for the flow-node method are accessed under the params parameter. In this example, the parameter for the encode method is defined as uri:
parameters:
  uri:
    name: URI
    description: The URI to encode.
    required: true
    initialType: string
    schema:
      type: string
The logic checks that the parameter is set. If the uri parameter is not set, it throws a new Error.
If the uri parameter is set, the value would be uri encoded and returned.
Step 5: Install the plugin in an API Builder project
Now it is time to test the flow-node we just created. All we need to do is get back to the API Builder project and install it.
// Create a new flow-node plugin

cd ../example-project
npm install ../api-builder-plugin-encodeuri
npm start
This will install the plugin inside of our project and will start the API Builder service.
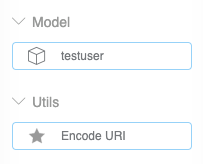
Launch the app and go to the the sample `Greet Flow`. You will see the flow-node we created under the `Utils` category where we placed it.
Drag and drop the new flow-node into the flow graph. You will notice the flow-node has two outputs as we described it earlier.
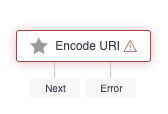
All we need to do now is clean up the Greet Flow from the sample greet flow-nodes and link our new node, by connecting the `Next` to the `Success` and `Error` to the Bad Request` node respectively.

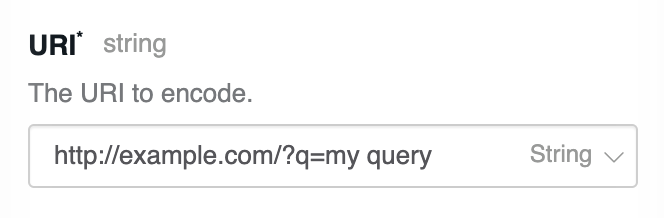
Notice the flow-node is still red, this is because we defined our `uri` parameter as required. Another thing worth noting is that we did set `initialType: string` in our specification, so we see it being selected by default in the UI.
We could dynamically get the URI from a selector, but to keep things simple lets set the uri we want to encode as String - i.e. http://example.com/?q=my query\.
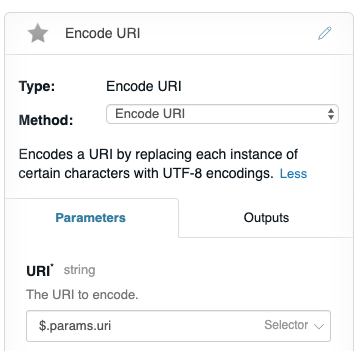
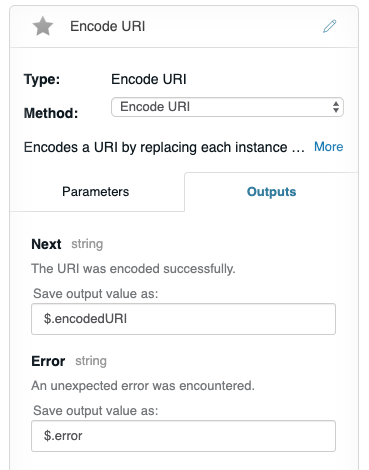
Next and final step is to define in which context variable the response will be saved. For that click the `Outputs` section of the flow-node. Here you can see that when successfully encoded, the result will be available as`$.encodedURI` and if it failed it would be accessible as `$.error`.
Now that we know what our flow-nodes is going to set, we can select the `Success (HTTP 200)` flow-node and amend it to include the result of our flow-node in it is body:

With that done, all we need to do is run and see our flow-node in action! To do so you can click on the debugger icon and expand it.

As we tweaked the Greet flow, we still have the username as required in that flow, so just pass any value as `username` to it and click `Execute Flow`.

You can see the encodedURI variation of what we hardcoded in the body of that response!
This is it! We have successfully created a new custom flow-node plugin and used it within a project in one fully working example!
You now know how to create a custom flow-node and use it in your API Builder apps. We would like to encourage you to expand on this and experiment yourself! For example try to switch to a `selector` and get the value out dynamically. Another cool thing would be to find a way to restrict the URI parameter to accept only URLs(currently it accepts all strings) or even create a more complex variation that does something interesting you need. If you have any questions, let us know!