Manage flow-nodes
6 minute read
This topic describes how to manage flow-nodes and the connections between flow-nodes on the API Orchestration user interface. The API Orchestration user interface is accessed from the APIs List page on the API Builder Console by selecting a Flow icon or a Create Flow icon for a generated or imported endpoint depending upon the current endpoint status. The API Orchestration user interface is divided into the following panels:
- Flow-node list (left side of the API Orchestration user interface) - Provides a graphical listing of the Model and Core flow-nodes. The default Core flow-node types are Authorization, Custom, Codeblock, Condition, Delay, HTTP, JSON, JavaScript, Mustache, and Set Context. A model flow-node is displayed for each configured model, and an endpoint flow-node is displayed for each imported endpoint. Flow-node list can be collapsed by clicking the Collapse icon and expanded by clicking the Expand icon.
- Flow editor (center of the API Orchestration user interface) - Provides a graphical space to view, edit, and create flows.
- Flow-node configuration (right side of the API Orchestration user interface) - Provides the functionality to configure the Name, Method, Parameters, and Outputs of flow-nodes.
API Orchestration user interface example:

The procedures in this topic appear in the most probable configuration order. To manage API endpoints, refer to Manage Endpoints. To manage API endpoint flows, refer to Manage Flows.
Add flow-nodes
To add flow-nodes to a flow:
- Select the flow-node to add to the flow from the listed flow-nodes from the panel on the left.
- Drag the selected flow-node onto the flow editor panel in the center of the API Orchestration user interface. The flow-node will automatically align with any additional flow-nodes in the flow. A warning message may be displayed, and the flow-node may be highlighted until it is configured.
Managing the flow graph
As you develop further your business logic, the flow graph will grow exponentially. We have added a set of shortcut keys to help you operate more easily. They are as follows:
- Panning - Press the arrow keys to move the flow graph.
- Zooming - Press the
+and-keys to zoom in and zoom out respectively. - Reset - Press the
0key to reset the position and scale of the flow graph.
Configure flow-nodes
To configure flow-nodes in a flow:
- Select a flow-node on the flow editor panel to configure its properties.
- If necessary, select and change the default flow-node name. Flow-node naming should reflect the function of the flow-node.
- Select a Method from the Method drop-down menu. For additional information on the Model and General flow-node Method selections, refer to Flow-nodes.
- Select Parameters and complete or edit the parameter configuration entries. If selector is selected from the selector drop-down menu, as you begin typing in the parameter field, a drop-down menu of valid or previously used selector options is displayed. You may optionally choose a selector from the list, or continue typing to configure the parameter manually. For additional selector auto-complete information, refer to Selector and output auto-complete. Note that the parameter entries are dependent on the selected flow-node method. For additional information on the Model flow-node and General flow-node configuration parameters, refer to Flow-nodes.
- Select Outputs and complete or edit the output configuration entries. As you begin typing in the output field, a drop-down menu of valid or previously used output options is displayed. You may optionally choose an output from the list, or continue typing to configure the parameter manually. For additional information on the Model and General flow-node output configuration for each method, refer to Flow-nodes. Once the flow-node is properly configured, the warning message is longer displayed, and the flow-node is longer highlighted.
Selector and output auto-complete
When you edit a selector or an output parameter, any previously used or valid selectors or outputs are displayed in a context-assisted drop-down menu that shows the selectors or outputs that match the input text. You may optionally choose a selector or output from the list, or continue typing to configure the parameter manually.
Authorize flow-nodes with credentials
Note
This feature requires at least v2.0 of the Swagger plugin.If authorization is required for a flow-node, then it will contain a drop-down for you to be able to specify the Credential to use. It requires that you have previously configured Credentials, any that are valid and ready to be used as authorization parameters in your flows.
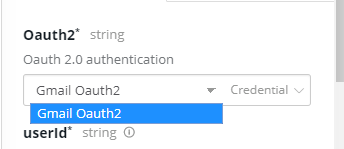
Alternatively, credentials can be accessed by name using the Authorization flow-node and provided to flow-nodes which do not advertise authorization parameters using a selector.
Connect flow-nodes
Note
All API endpoint flows begin with a default Start flow-node.Start flow-nodes can only be connected to one other flow-node in the flow. To connect the output of the Start flow-node to the input of another flow-node:
- Click on the Start flow-node.
- While leaving the Start flow-node selected, move your pointer off the Start flow-node. The output connection on Start flow-node and the input connections on the additional flow-nodes in the flow will be displayed. The connector from the Start flow-node will follow the movement of the cross-hair of your pointer.
- Pull the connector towards the next flow-node to include in the flow. The connector will snap to the input of the next flow-node to include in the flow when you hover over it.
- To finish the connection, drop the connector on the input of the next flow-node in the flow. The flow is automatically rearranged according to the existing connectors and flow-nodes.
To connect the output or outputs of a flow-node to the input of another flow-node:
- Click on the output of a flow-node to connect to the input of another flow-node.
- While leaving the output of flow-node selected, move your pointer off the output of the flow-node. The output connection and the input connections on the additional flow-nodes in the flow that can be connected will be displayed. The connector from the output of the flow-node will follow the movement of the cross-hair of your pointer.
- Pull the connector towards the next flow-node to include in the flow. The connector will snap to the input of the next flow-node to include in the flow when you hover over it.
- To finish the connection, drop the connector on the input of the next flow-node in the flow. The flow is automatically rearranged according to the existing connectors and flow-nodes.
Remove connections between flow-nodes
To remove a connection between flow-nodes:
- Select the connection to remove.
- Click the keyboard Del key or Backspace key. The selected connection is removed, and the flow is automatically rearranged according to the existing connections and flow-nodes.
Remove flow-nodes from flows
To remove a flow-node from a flow:
- Select the flow-node to remove from the flow.
- Click the keyboard Del key or Backspace key. The flow-node delete caution screen is displayed.
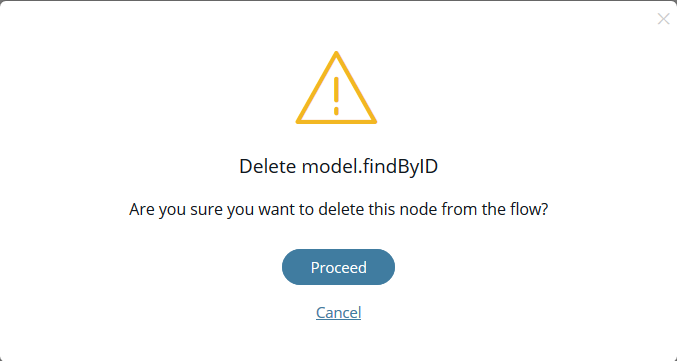
- Click Proceed to complete the removal of the selected flow-node and return to the flow. Select Cancel to cancel the removal of the selected flow-node and return to the flow.